What do you do when you have an idea for a design that you believe to be perfect for a third-party submission call, a deadline to submit by, and no yarn in the right colour to knit your sample? Well, to my mind there are two options; buy what you need or dye your own.
Since I'm actively trying to reduce my stash, I went with the second option. I've dabbled in Kool-Aid dyeing in the past, mainly as a rainy-day activity with my children, so I have some Kool-Aid packets and some undyed yarn in the house.
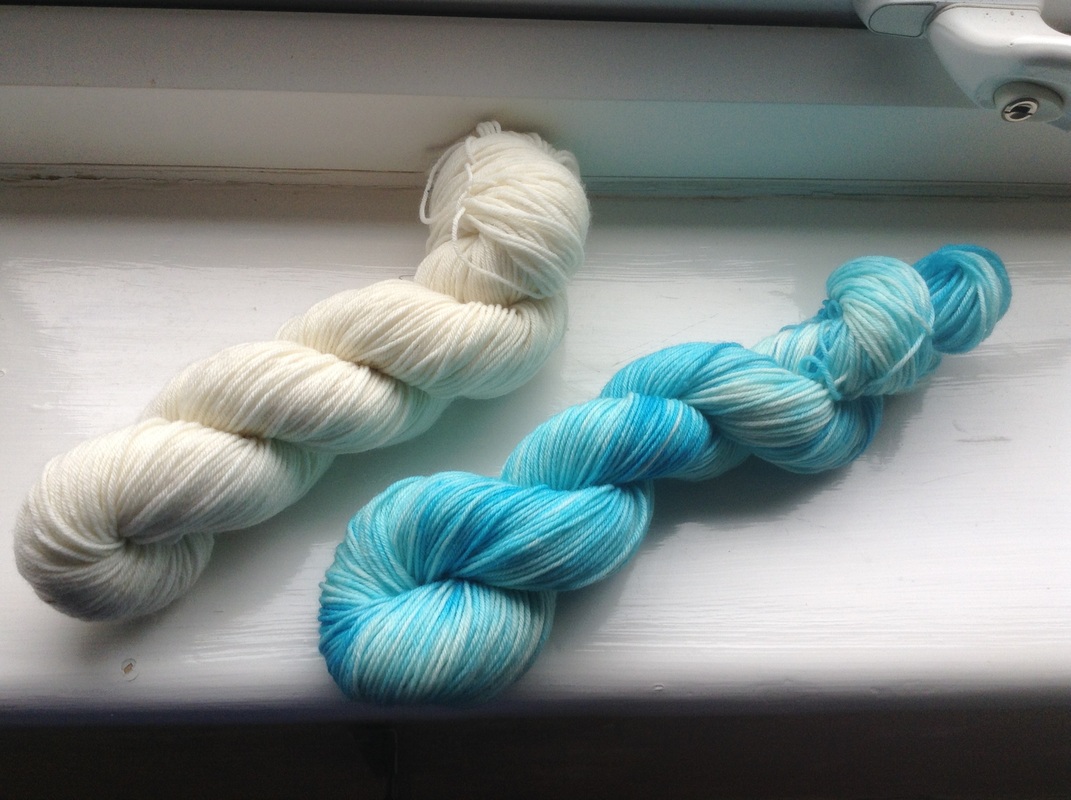
The design requires pale blue yarn and either navy or black. I have navy sock yarn but no pale blue, and really I didn't want solid colour. What I was envisioning was something semi-solid blue and white, like high clouds in a blue summer sky.
I'm not going to write a detailed tutorial on Kool-Aid dyeing. There are plenty of those online already. Instead this is going to be more of a photo record and notes of what I did, in case I want to do it again. It can act as a good aide-memoir if you've done this and just need a bit of a reminder.
I'm using the microwave method, because it's quicker than using a slow-cooker or a pan on the hob, and also because I want a kettle-dyed look so I don't want the yarn to move about too much in the container or the dye bath moving around too much either.
Here we go....
Step One: Soak the yarn in water. The yarn I had was already securely tied in a skein, but if using loose yarn, tie it in several places before you start, to avoid ending up with a tangled mess before you finish. I soaked it in hot water from the tap with just a dot of washing-up liquid to break the surface tension and let the water penetrate the fibres, leaving it for about half an hour.
Since I'm actively trying to reduce my stash, I went with the second option. I've dabbled in Kool-Aid dyeing in the past, mainly as a rainy-day activity with my children, so I have some Kool-Aid packets and some undyed yarn in the house.
The design requires pale blue yarn and either navy or black. I have navy sock yarn but no pale blue, and really I didn't want solid colour. What I was envisioning was something semi-solid blue and white, like high clouds in a blue summer sky.
I'm not going to write a detailed tutorial on Kool-Aid dyeing. There are plenty of those online already. Instead this is going to be more of a photo record and notes of what I did, in case I want to do it again. It can act as a good aide-memoir if you've done this and just need a bit of a reminder.
I'm using the microwave method, because it's quicker than using a slow-cooker or a pan on the hob, and also because I want a kettle-dyed look so I don't want the yarn to move about too much in the container or the dye bath moving around too much either.
Here we go....
Step One: Soak the yarn in water. The yarn I had was already securely tied in a skein, but if using loose yarn, tie it in several places before you start, to avoid ending up with a tangled mess before you finish. I soaked it in hot water from the tap with just a dot of washing-up liquid to break the surface tension and let the water penetrate the fibres, leaving it for about half an hour.

Step Two: While I was waiting for the yarn to get thoroughly wet, I mixed up the Kool Aid. It's not the amount of water that affects the intensity of your colour, it's the amount of dye. Checking a couple of websites, I found that the recommended amount for a really saturated colour is 2-4 sachets of Kool Aid per ounce of yarn. I'm dyeing 50g of yarn, which is about 2 oz, but I don't want a really saturated colour. I'm after something quite pale, and the only blue Kool Aid I have is Mixed Berry which is quite a bright blue. I decided to just use one sachet, and add it a little at a time in case I decided not to use the whole sachet. I used one sachet of powder in a full large glass (400ml/ 3/4 of a pint) of hot tap water.
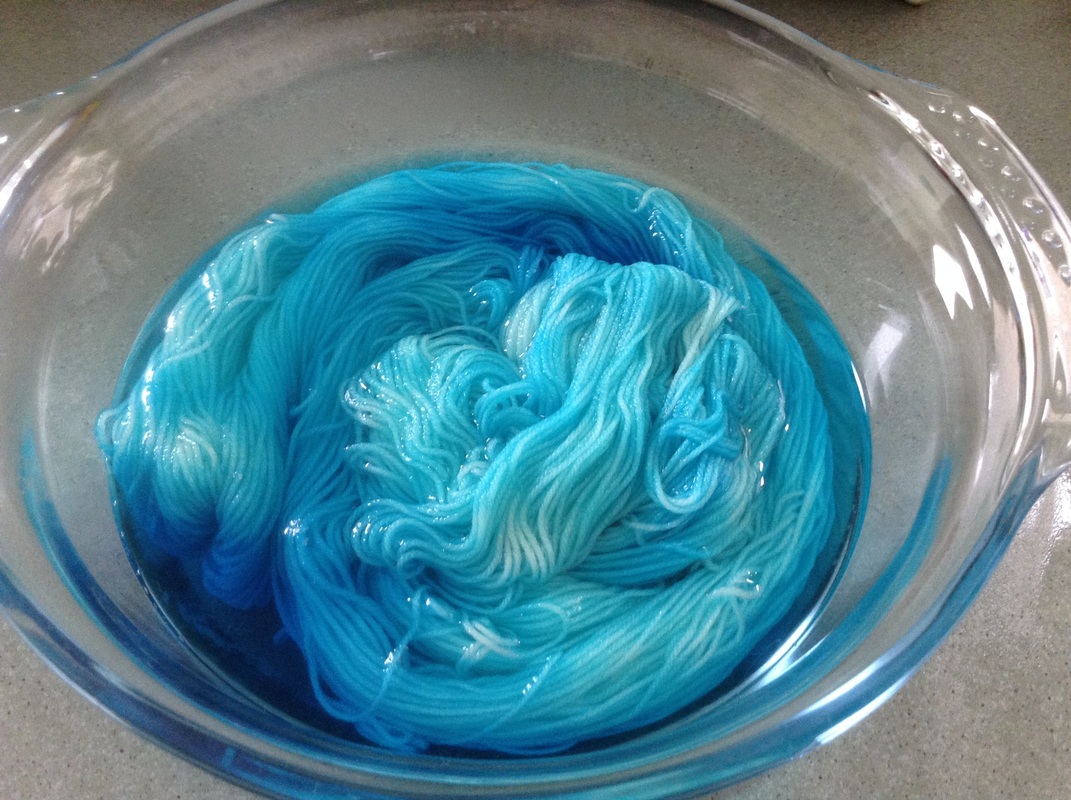
Once I was ready to start colouring the yarn, I drained the water out of the dish and rinsed the yarn in hot tap water to get rid of the detergent. Then I lifted the yarn up and poured a little of the Kool Aid solution into the bottom of the dish, to make sure the underside of the yarn definitely came into contact with some of it. After laying the yarn back in the dish in a spiral (to ensure I was colouring all of it), I poured in the Kool Aid solution a little at a time, concentrating on two areas. You can see in the photo below that there's a darker spot on the bottom left and another smaller one in the middle of the top of the bowl. Of course the liquid spreads out around the dish, and I sprinkled some on top with a spoon too to make sure all the yarn was covered. I did end up using the entire glass of Kool Aid solution. (An advantage of using a glass dish is that you can see if the underneath of your yarn is coloured by just looking through the bottom of the dish!)
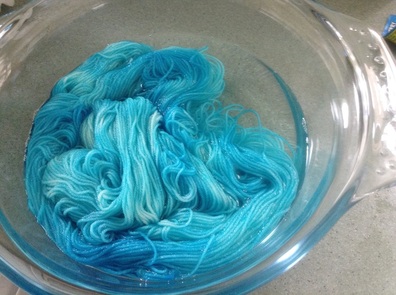
Step Three: What you need now is heat, to bond the dye particles with the yarn. As I mentioned above, I used the microwave for this. I did two minutes on the High, and then took the dish out of the microwave and let it cool for a few minutes before repeating. It took a third session of two minutes on High for the dye to exhaust. You can see in the picture below where I've pulled the yarn aside that the water it is sitting in is now clear. All the blue has been absorbed into the yarn. I left it out to cool down. I've read in several places that blue dyes can be a bit tricky, taking longer to exhaust than other colours and also longer to set, so I left the yarn to cool until it was comfortable to touch. (Some sites suggest leaving it to come right down to room temperature, and others still to leave it overnight, but I'm too impatient for that!!).
Step Four: Drying. This is the bit where you understand why tying the skein was important. It's much easier to pull a neat, skeined loop of yarn out of the bowl and pin it up to dry than to deal with something that looks like a hamster has been making a nest from it!
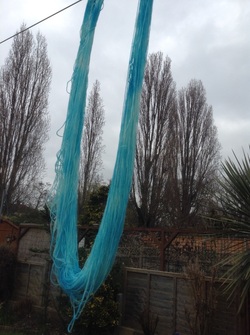
To get it as dry as possible first, I wrapped the yarn in a towel and squeezed as much water out of it as I could. After that, I put the yarn into a cloth bag and tied the top securely (one of those mesh bags for laundering your smalls would be better but I don't have one!) and put it through a spin cycle in the washing machine. It didn't take long drying on the washing line after that. Goodness knows what my neighbours think, though!
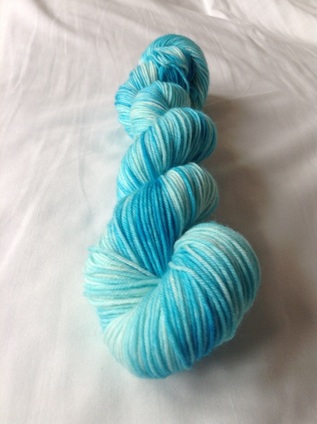
And this was what I ended up with. Excuse the photo-fest but I'm so so pleased with this beautiful little skein of yarn. I keep looking at it, and it almost seems too pretty to knit with. I'll need to, though, if I'm going to get this pattern submission in on time! (I've done a sort of before-and-after shot as well, using the dyed skein next to another undyed one from the same supplier.)
 RSS Feed
